Wednesday, August 31, 2011

Double Whammy

Up till now, I've only posted about what I've been making myself for dinner. Today, I'm also including what I've been making myself for lunch. I like to call it my "Super-Delicious-Ultra-Pregnant" Sandwich. Subway, eat your heart out. There's a new sandwich provider in town. And it's made by Ev the Chef of "Evthechef.blogspot.com!"

SUPER-DELICIOUS-ULTRA-PREGNANT SANDIWICH 
Ingredients (from left to right): Olive Oil Garlic Infused Bread (from whole foods), Diced Onions, Potbelly's Hot Peppers, Beef Brisket, and BAAAACCCOOOONNNN!!!!

1) Heat: the bread to desired temperature. For me, I microwave it for 20 seconds on "high."

2) Heat: the bacon for about 30 seconds on "high" or to desired temperature.

3) Heat: the brisket for about 40 seconds on a "medium" setting or to desired temperature.

4) Here's where it gets tricky. Take a knife and slice the bread open (just like they do at Subway)

5) First, place the brisket onto the bread like so:
* I forgot to mention...before you line the bread up with brisket, place pieces of lettuce along the bread for fiber!

6) After that, drizzle the hot peppers on top of the brisket. The reason I use Potbelly's Hot Peppers is because there's a variety of peppers within the container....and it soaked in their secret sauce. Yummy!
Plus, I feel like a man whenever I successful eat the peppers without grabbing a sip of water.


7) Next, evenly scatter the diced onions along the peppers.

8) Lastly, the moment you all have been waiting for....PLACE THE BACON ON TOP OF THE ENTIRE CONCOCTION!!!

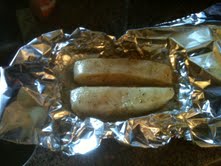
9) Now, because this sandwich is bursting with flavor...and products, it's hard to keep everything within the sandwich without having the thing and the contents spill out. Therefore, tightly wrap the sandwich in aluminum foil....like a baby....and now, you can enjoy your delicious sandwich. Upon finishing the task, pat your belly and congratulate your stomach, for downing this monstrosity is no easy feat.
* Sandwich wrapped in aluminum foil. Kinda looks like a sleek metallic fish.

Now, if ya'll remember, I was preparing my chilean sea bass for tonight's dinner.....:

After removing the sea bass from its bag,

1) Preheat the oven to broil

2) Place the rack about 6 INCHES from the broiling element (located at the top of the oven for all you befuddled people)


3) The fish should be cooked for a total of 6 minutes. Keep rotating the sea bass so each surface gets equal loving.

4) You're DOOOONE!!!!


* Unfortunately, I forgot to take a picture of my Chilean Sea Bass. I was very hungry and ate it all before I remembered to take a picture. My bad.

* the rest of my dinner. Corn and Chicken Wings!!!!

Tuesday, August 30, 2011

Too much Deliciousness on One Plate

So, I realize that I've been pretty lazy in my last few posts in that I haven't been posting many pictures. Well fear not! Today's post comes to you with a plethora of pictures...and love. Lotsa love <3!

Today, I decided to make my Salmon Sake dish...except this time, I'm using Ling Cod instead of Salmon. Why? Well, because Ling Cod has the taste of a fattier fish, like Chilean Sea Bass, but the health benefits of Salmon...so you're getting the best of both worlds with the Ling cod. And surprisingly, this fish hails from the Atlantic. Judging by the name, I thought it'd come from the Orient. Whoops, my bad!!!

Sexy Ling Cod Swimming in Sake 
* cilantro and chopped scallions. notice how detailed and delicate the scallions look....it's the work of a chef who has dexterous hands and an eye for beauty....and oddly enough, that chef is me. WHAT A COINCIDENCE!!!

The cilantro and chopped scallions will be added to....
*to the right bag depicts what Ling cod looks like. the left contains chilean sea bass, which is what I'm cooking for dinner manana. Again, it's marinating in the sake/mirin concoction...but remember, this is done in a day's time...not 2 days like the original recipe calls for. Gotta keep ya'll on ya'll's toes...


After the fish is done marinating, follow the steps of my original recipe....this will contain how to set up the grill....use indirect heating...how much time to cook the fish...and all that other good stuff!


OKAY!!!! So as the title so eloquently states, there's a lot of deliciousness on one plate . In addition to a fish, I'm also adding shrimp...because shrimps are delicious, and they enhance one's libido ;).

My shrimp skewers are prepared exactly the same way as I have in my previous posts. Drizzle some olive oil, some GARLIC SALT, cilantro, and scallions, and massage/ grope them as if it's your last time doing so....(just grope and massage them the way a sick pervert would)


I don't remember if I've ever mentioned this, but I always cover up my shrimp after I've marinated them. The reason is to prevent the air from drying out the shrimp. A dry shrimp = a not so succulent shrimp = no bueno = UNHAPPY EVAN!!!!

Remember, after you marinate the shrimp, heat up the grill...and use indirect heat to grill the shrimp. Also, grill each side of the shrimp for about 1 minute...no more than 2. Otherwise, it'll become overcooked...and trust me, overcooked shrimp tastes like doggy doo doo. But at least it's not ACTUAL doo doo....

So that's my dinner. I also utilized my microwavable skills to make myself some brown rice. Contrary to popular belief, brown rice is DELICIOUS. And its healthy. I know this because all the tabloids tell me celebrities eat brown rice to stay fit and sexy. If it works for them, why not me?


*Editors' note: The fish was soooo delicious. I absolutely fell in love with Ling Cod...sorry salmon, but you've been replaced by the younger, sexier, more succulent fish :D

Monday, August 29, 2011

Fiiiiiish chilling with Asparagus

Hi Angela. (Angela's my girlfriend). Here's what I had for dinner today....since you keep badgering me...Hope you're impressed by my skills...


SEXY SALMON SWIMMING IN SAKE....plus IMPECCABLY GRILLED ASPARAGUS!!!

* Now, the sexy salmon dish is cooked exactly the same way as in the previous posts...except this time, I marinated it for only 1 day instead of the usual 2. Why? Because I'm smart. Like stupid smart. But seriously, it's because I wanted to eat that dish today and couldn't wait the full two days for the dish to be cooked properly. I also grilled the fish with scallions this time...because I can...and because you can never have too many scallions.

Now for the Asparagus:
It's really very simple...even my 11 year old pug (Pucky) or my 6 year old pug (P.J.) can cook it...and they don't even have hands. They have paws...but then again, they're also STUPID SMART!

1) Grab your asparagus and season them with salt and pepper and, of course, the right amount of olive oil

2) Meanwhile, set your grill to 350 degrees F. (medium setting)

3) Once the grill reaches the desired zesty temperature, place the asparagus on the grill.

4) Every 5 minutes, toss them around (like a salad), shake them around (like a polaroid picture), or flip them around (like a burger) for a total of 20 minutes so all the sides of the asparagus are cooked evenly.

5) Remove the asparagus from the grill and take a giant whiff of the delicious aroma. Let that smell penetrate your nostrils and stimulate your parasympathetic system!

6) Celebrate (good times, cmon!) your wonderful accomplishment. Once again, you've exceeded all expectations and 1) cooked a delicious meal and 2) didn't burn your house down.

So yea, that was my dinner. Got my fiber and protein...plus some delicious scallions on the salmon to give it a nice texture.

Thursday, August 25, 2011

Ribs, Bratwurst, and Corn...

So I've just realized that I absolutely love Krogers. Why? Because once again, I'm using their premade products to cook myself a delicious dinner. Today's guinea pig is their "Pre-marinated St. Louis Style Ribs."Also on the menu is Bratwurst and, of course, Corn. Bratwurst because I wanna be cultured...corn because I just love my corn. :)

RIBS!!!! 

1) Go to your nearest grocery store and purchase any "pre-marinated any-style" ribs.

2) Remove the ribs from its packaging and....

3) Wrap the rack of ribs in aluminum foil. This takes a lot of concentration and focus.

4) Meanwhile, warm the grill up to 350 degrees F (medium setting).

5) Once the grill is set, place the aluminum-covered-ribs in the grill for 20 minutes. Grab a beer because that's all the hard work you hafta do!

* looks like a gigantic silver cucumber....kinda funny.

So...in addition to Ribs, I also decided to be German and cook me some...
BRATWURST!!!! 
Ingredients: "Johnsonville Brats," Guiness Dark Beer

1) Heat 3 bottles of Guiness Beer until it boils. The beer is used to add flavor to the Bratwursts...and make them authentic. How do I know this ensures authenticity? Because Germans love beer, and the more beer you add, the more authentic your dish becomes.

2) After the water has boiled, put the Bratwurst in the pot and wait for it to boil again.

3) Turn off the heat and leave the Bratwursts sitting in the beer for half an hour. 

4) Then, take them out to the grill for 10 minutes on a medium setting (350 degrees F)

AND FINALLY:
Corn 
I'm so talented.


Wednesday, August 24, 2011

Back from my prolonged absence

Ok, I must admit. I've been a naughty, bad boy. I've been neglecting my blogging duties...and for that, I do apologize. But fear not, for I have returned to further share whatever crazy concoctions I think up with ya'll.

So I had to pick up me madre from the airport today, so suffice to say, I didn't have as much time to cook as I normally would have. Therefore, I utilized an age old recipe that my mom uses when she's pressed for time...and without further ado, I present:

GREASY CHICKEN!!!!! 
So as a youngling, this was my favorite dish in the whole wide world. Why? Because it's greasy (hence the name), is loaded with succulent spices, and...it's protein.

Ingredients (from left to right): Kroger's (or any grocery store) Chicken Drumsticks and "Shake 'N Bake Hot and Spicy" container

1) Read the directions as listed on the "Shake N' Bake" Box. Preheat the oven to 400 degrees F. (what it states on the direction, I believe)

2) Release the chicken from its packaging.

3) Rinse the drumsticks (or whatever you're cooking) with water.

4) While the chicken is moist, place them two at a time into the bags provided by "Shake N' Bake.

5) Shake them....like a polaroid picture.

6) Remove the drumsticks from the bag and place them onto a baking sheet.

7) Place the chicken in the oven for as long as the directions state.


* I feel that the lighting really makes the chicken sparkle

Now I need some carbs to go with my chicken dish, so what better dish to pair with the "Greasy Chicken" than....
BERTOLLI'S SHRIM SCAMPI LINGUINNI 

1) Read the directions

2) Follow the directions

3) Enjoy the hell out of your linguini!!!


*THAT'S MY DINNER FOR TONIGHT. AREN'T YOU JEALOUS? I WOULD BE!!!

Now unfortunately, I was still hungry after finishing my meal, and I thought, "Hmm...I didn't eat any fiber today. I want to have an enjoyable, relaxable experience when I'm using the restroom...." So true to form, I went on a journey into my fridge to see if I had any frozen vegetables I could make myself...and sure enough, I found it. And it's by far the BEST FROZEN VEGETABLES I'VE EVER EATEN....

HEAVENLY VEGETABLES  


This is the packaging. It's called Birds Eye Steamfresh. It "perfectly cooks in the bag," so you know this product is legit. The veggies are a mixture of corn, carrots, and green beans. I normally am not a fan of green beans, but this company cooks them perfectly. So yea, tastes delicious, is time efficient, AND it's healthy...because remember, nutrition is important.

So yea, I do apologize again for my absence this past week...but hopefully I've more than made up for it with these three dishes. Adios, wo de peng you.

Wednesday, August 17, 2011

It's been awhile....

First off, I would like to apologize for being so MIA these past few days...I haven't really cooked much, as I have been nursing the various injuries I've acquired via my time in the kitchen.

Now I have some good news...and some bad news. The good news is that I am now back to full health and DID COOK TODAY. However, the dish I cook was one that ya'll are already familiar with: my famous corn and pork chops....covered with pesto.

Bbbbut, don't worry...I will come up with something new AND exciting to cook tomorrow.

Till then....

Sunday, August 14, 2011

Ev the Chef's Weekend Special

I have to meet up with my bros this evening, so whatever's on the menu had better be swift. First off, I forgot to mention two days ago that I planned to do my swimming in sake fish dish again, but this time with Chilean Sea Bass.  So these sexy babies have been soaked in a ziplock bag with 1/4 cup sake and 1/4 cup mirin for two days in the fridge now.  I just took them out, and added olive oil and the amazing garlic seasoning that I introduced yesterday.
*drunken seabass inviting ya'll to follow my recipe

Since I'm pressed for time and I love max meat, I got this pre-marinated baby back ribs at Kroger's at a great bargain -- won't burn a hole in my pocket book, since I've already splurged at Brooks Brothers yesterday (not for food, silly)

*cheap, no hassle, no work baby back ribs -- if it contains unhealthy ingredients, the grill will burn the heck out of it, so only healthy, yummy meat remains

So then I spray the outdoor grill with PAM GRILL,  heat it up to medium (approx 350 degrees), throw the ribs on for 10 minutes each side. And 5 minutes before ribs are done, I take out the fish-grilling apparatus and put sea bass on it, and grill for 2 minutes each side, like so:

I have no time to take picture of finished products, but I devoured it all, and man it's good and you know it. I'm out of the door now.  Until tomorrow, bon appetit!


Saturday, August 13, 2011

Green-with-Envy Sugar Snapped Peas...among other things

Today, I went to Brooks Brothers. I felt ridiculously out of place at first, but circumstances dictate that I must shop there...however after being warmly serviced by the nice elderly Brooks Brothers sales associate...and having seen all the apparel that the store offers, I decided right there and then that I should reinvent my lifestyle and become a lil more prep-douche in order to warrant shopping at Brooks Bros. LOL.
* what a majestic entrance!!!

Anyways, I'm not writing this blog to gush about Brooks Brothers. Rather, I'm writing this blog to share my recipes with ya'll. Today's line up consists of
Green-with-Envy Sugar Snapped Snow Peas. Why are they so aptly named? Well, read along with me, and you'll find out!

Green-with-Envy Sugar Snapped Snow Peas 
Ingredients (from left to right): salt, pepper, two bags of sugar snap snow peas (totalling 1lb.), minced garlic (ya'll know my m.o. - i'm lazy!)

not pictured: wok, olive oil, and cup of water

1) Grab a wok. Turn the stove onto high and drizzle olive oil into the pan. Once the pan heats up, turn the stove down to its "between medium-high" setting.

2) Scoop a spoonfull of garlic and place it onto the side of the wok to avoid splashing it in the olive oil.

3) Swiftly dump the vegetables into the wok as if you were a ninja.

4) Grab a spatula and stir the vegetables around in the wok using your wrist skills. Dexterity is the key. Remember, you're a ninja.
* look at my wrist. notice how they're curved a little bit? that's the true sign of dexterity. But if you are a pianist, you must not curve your wrist like so unless you are at the end of playing a staccato.

5) Add a little bit of water to the the vegetables and stir it some more. The water helps soften the peas, since they're so hard.
* I've noticed in my travels that water usually helps to soften objects....

6) Cover the wok with a lid for about 1 minute (depending on how soft you want it). The longer you keep the lid on, the softer it becomes. I like my veggies hard. It adds texture to the peas.

7) Remove the lid. Voila! You're done! Do a victory lap to celebrate your recent accomplishment!

* look at how green those peas are. mmm so delicious. this is why they're called "green with envy." i would say this is the only time that the greener you are with envy, the better the circumstance.

Ok...so I was actually feeling on a roll today, so I also cooked up something extra!

Evan's Shrimp 2.0 
This is a variation of my original shrimp dish. The recipe essentially stays the same, except the seasoning differs.

Ingredients: PAM, shrimp skewers, skillet, chopped scallions, chopped cilantro, olive oil, and "Baron's Herb and Garlic Seasoning"
* Baron's Herb and Garlic Seasoning

1) Place the shrimp skewers into an aluminum container and drizzle them with olive oil. Place the scallions, cilantro, and seasoning onto the shrimps and mix heavily into the shrimp with your hands. Don't be shy to grope the shrimp; you won't get arrested. I promise.

2) Simultaneously, place your skillet onto the stove and set it on high.

3) Once you're done seasoning the shrimps, change the setting on the stove to medium. Spray the skillet with PAM cooking oil and place the shrimps onto the the skillet.


4) Follow the same exact procedures as my original shrimp recipe.

5) This is how the shrimps should turn out.

I've really outdone myself. Unfortunately, the price of whipping up two dishes is that I'm now beat tired from all this cooking! On the plus side, my kitchen now smells the way I imagine Bobby Flay's kitchen would smell...


Friday, August 12, 2011

Friday Dinners

I love Fridays. It's the end of the week, it's the start of the weekend, and it's the day I reward myself with a nice juicy piece of steak. Now, today's entry won't be in the same format as my previous posts. Today, I'm just going to display what I had for dinner.


* bone-in ribeye steak, corn, fries, and salad with italian dressing.

I'm not a big salad guy. Ask anybody I know, and they'll tell you I'd rather have something substantial rather than "rabbit food." However, I've discovered "Wishbone Italian Dressing." Why? Because it "helps better absorption of Vitamins A&E." Plus, my dad's a fan of this dressing...and if he's a fan of it, you better believe everybody should/will be as well.


*mushrooms

I don't really like mushrooms, but there was enough garlic to hide the mushroomy taste.

Anyways, I'm about to go watch a movie, so until next time, my lil foodies, zai jian!!!!

Thursday, August 11, 2011

Cooooorn....wrapped in a blanket

So today I decided that I would take my recent fondness of corn and change the game up a little bit. I'm taking my generic usual corn recipe and adding a little twist to it: i'm wrapping it in aluminum foil and adding chile peppers to it. Spicy! Muey Caliente!!!

Ingredients:
From left to right: "Fisher & Wieser" Roasted Raspberry Chipotle Sauce and Hatch Sweet Chile (which can be bought conveniently at Whole Foods)

*not pictured: Corn, Aluminum Foil, Container to hold the Corn, olive oil

1) Cut your corn into 1/3s. The reason is so that it's easier for the corn to soak up the ingredients. Plus, I find it easier to handle/eat. Place them into a container. Pour the raspberry chipotle sauce into the container, along with olive oil and peppers, until it resembles the picture below:


* I lined the container with parchment paper. Also make sure you toss the corn around so every kernel gets saturated with the sauce.

2) Place the corn into aluminum foil and wrap the corn with it. The corn should look like they're being carried in a pouch...like a baby kangaroo.

* kinda resembles a chipotle burrito! yum!

3) Go outside. Locate your bbq grill, then heat the grill to medium heat. Throw the pouch on the grill (like it's hooot) for 15 minutes, then turn the pouch over for another 15 minutes and there you have it -- delicious as ever! (I did not take pics of grill cos it's 106 degrees outdoors. I prefer to stay inside while the  corn is grilling).

4) Open up the pouch and admire your succulent corns!

Wowzers! What a beautiful sight. I may just cry from the beauty I've just created!!! The sweetness of the chipotle sauce coupled with the heat of the peppers creates a harmonious union in my mouth.

Monday, August 8, 2011

Things I learnt in Cabo...


Hola amigos! I'm finally back from my one week vacation in Los Cabos, Mexico. Boy was it fun...jet skiing, swimming with dolphins, snorkeling, and of course...eating. I gained sooo much weight, I look like a beach ball. Of course I didn't cook during my vacation, but I definitely did pay attention to the chefs who cooked my meals. The following is a collection of the dishes I thought were tasty, impressive, and of course, easy to make! 

Caesar Salad...the Mexican way!!! 
Ingredients: Olive oil, mustard, garlic, 1 egg, Worcester Sauce, Vinegar, Salt, Pepper, Romaine Lettuce

1) Add 2 tbsp of olive oil into a bowl...preferrably the one in the picture. 

2) Add a tbsp of mustard


3) Add a teaspoon of Worcester sauce

4) Add 1/2 tbsp of vinegar to the mixutre

5) Add salt, pepper, and garlic to taste. 
6) While adding all these ingredients, keep stirring the contents to create a homogenous yellowish/tannish color. It's not a very sexy color btw. 
7) Next, dump the lettuce into the bowl and stir vigorously so the lettuce becomes coated in the caesar dressing. 


The Desserts: 

"3 ball Sundae" 
*such a funny name hehe -- but easy to make -- just dump 3 scoops of icecream into a fancy-looking glass.... add herb decorations, like mint perhaps.

Chocolate cake

* so sexy

Shrimp Scampi

Yellowtail